Wednesday, August 31, 2011

Spinach and Tomato Alfredo Pizza

I used red grape tomatoes and little yellow tomatoes shaped like pears--I love all of the bright pops of color against the white alfredo sauce!


Once in awhile I like a pizza that is a little less traditional, as in a red tomato sauce and mozzarella cheese, and this one fits the bill perfectly. Instead of a tomato sauce, I make a homemade alfredo sauce, and instead of gooping the top with mozzarella, I use the alfredo sauce as sort of a thin layer of cement for the spinach and tomatoes and just garnish with a bit of grated parmesan after it comes out of the oven. I like keeping this vegetarian, but it tastes great with shredded/diced chicken added as well.


Spinach and Tomato Alfredo Pizza

1 12-14" prepared pizza crust (try my 100% whole wheat pizza crust)
4 oz neufchatel or cream cheese, cubed
1/2 cup parmesan cheese, grated
1 cup grape or cherry tomatoes, halved (or larger tomato/es, diced)
1 cup baby spinach, torn into bite-sized pieces if necessary
2 cloves garlic, minced
1/3 cup homemade vegetable stock, milk or any vegetable/chicken stock
Salt and pepper to taste

Step 1: Place stock/milk and garlic in a small saucepan over low heat. Heat for 5 minutes, being careful not to let it boil or even simmer. Stir in neufchatel/cream cheese, 1/4 cup of parmesan cheese, salt and pepper until cheeses are melted smooth. Remove from heat and let cool for 5 minutes.

Step 2: Spread cheese mixture on crust. Top with tomatoes and then spinach, pressing them down into the cheese mixture. If using my crust, after the crust is pre-baked, bake at 450 degrees for 7-10 minutes. If using another crust, bake according to package directions. When pizza is removed from oven, sprinkle with remaining parmesan cheese.


Cost:

Cream cheese (organic): $1.99 per 8 oz pkg, used 1/2 =$1.00
Parmesan cheese: $2.99/5 oz, used 2/5 = $1.20
Vegetable stock: Homemade Freebie
Crust (homemade): $1.04
Tomatoes: Garden Freebie
Baby spinach (organic): $1.50/pkg after sale and coupon, used 1/4 = $.38

Total Cost: $3.62
Eight Slices: $.45 per slice

Tuesday, August 30, 2011

100% Whole Wheat Pizza Crust

I wish I had taken a picture that didn't look so greasy! I swear I only used 3 oz of organic mozzarella on a 14" pizza, but there was turkey pepperoni too!


Like many other things in life, pizza crust is something many people seem to really be passionate about as far as the type they prefer. I'm not a huge fan of the thick, bread-like pizza crusts--I like a thinner, crispier crust, but still chewy on the inside. It's probably no surprise I also like to make my crust with 100% whole wheat flour. I use only the basic ingredients you will find in most traditional Italian brick oven-style crusts--flour, water, yeast and salt. No sugar, no oil. You might find the flavor a bit basic as well if you are used to crusts made with white flour, sugar/honey and oil/lard, so rely on high quality, flavorful toppings to really make it pop. If you do make this with a non-whole wheat flour, use the same proportions of flour, yeast and salt, but you may need to cut back on the water a bit.

I wrote this recipe with convenience in mind--it makes more than one crust (the exact number depending on the size you want them), one to use the day I make it and one or two to freeze for a quick meal another day. And like my 100% whole wheat buns recipe, you can choose to let the dough rise in the refrigerator overnight or even up to two or three days and work with it when you need it (I actually found the crust a bit tastier when I used dough that had risen in the fridge for a couple days). If you want to get even more convenience-minded and have the room in your freezer, make a couple batches up through the point of pre-baking, wrap well and freeze.

For me, this will make two 12"-15" crusts or three 9"-12" crusts, depending on how thick/thin I make them. If I feel like a cracker-thin super crispy crust, I will divide it into three parts and make them about 10", if I am doing our usual 14" crust that's crispy on the outside and chewy on the inside, somewhere between cracker-thin and original/hand-tossed, I will divide it into two parts. You could also make three or four personal-sized pizzas with a bit thicker crusts or even more with thinner crusts. You are probably tiring of me telling you to experiment/play around with recipes, but this is another basic recipe that has many options for you depending on your needs/likes.


100% Whole Wheat Pizza Crust

4 cups whole wheat flour
1 tsp active dry yeast (about 1/2 of a .25 oz pkg)
1 3/4 cups warm water
1 1/2 tsp salt

Step 1: In a large mixing bowl, combine flour and salt and make a well in the middle. Add water, sprinkle in yeast and mix until dough is smooth and comes together in a ball. It's okay if it's a little tacky, you want a well-hydrated dough.

Step 2A: Cover bowl and let dough rise in a warm place until doubled in size, about 1 to 1 1/2 hours.

OR

Step 2B: Cover bowl and let dough rise in refrigerator overnight or up to 2 or 3 days.

Step 3: Punch dough down well and form into 2-3 smooth, tight balls. If you are going to freeze some, wrap it well (I use plastic wrap and then place it in a heavy duty freezer bag) and freeze at this point. Dust remaining ball/s very lightly with flour on the outside, cover with damp towel, plastic wrap, etc. and let rest for one hour. If it's going to be longer than an hour before you will cook the crust/pizza, let it rest in the fridge and then let it come to room temp before rolling it out.

Step 4: Punch dough down well and roll, press or pull ball/s into desired shape, using flour where necessary to prevent sticking. Poke holes in crust with a fork. Depending on how thin you get it and what you cook it on, you may wish to bake it before adding sauce and toppings. A preheated pizza stone will probably not require pre-baking, but I always do if I am using a baking sheet or pizza pan. I pre-bake it at 450 degrees for about 5-7 minutes. I also bake my topped crust at the same temperature.

To use frozen dough: Remove dough from plastic wrap and cover lightly with flour. Let thaw and rest under plastic wrap, a damp towel, etc. for about two to three hours. You can also thaw it slower in the fridge, letting it come to room temp before rolling out whichever thawing method you use.

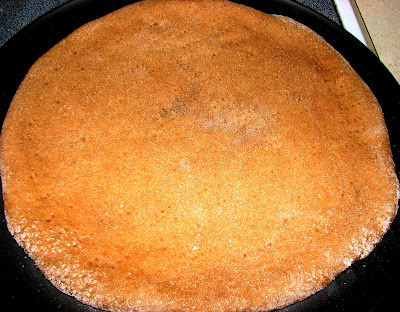
This was after pre-baking. It's about 14", and I made the outer rim a bit thicker than the inside.


Cost:

Whole wheat flour (organic): $2.84/2 lb bag, used 4/7 = $1.62
Yeast: $1.39/3 pk, used one = $.46

Total Cost: $2.08
Two Crusts: $1.04 per crust 
Three Crusts: $.69 per crust
Four Crusts: $.52 per crust

Sunday, August 28, 2011

Coupon Alerts!

Van's Natural Foods: Visit their Facebook page and click on the Breakfast with Benefits tab to print a $1 off coupon for one of their frozen breakfast products--waffles, pancakes, french toast sticks and muffin crowns. Hurry, this is a rare one!  Note: secure browsing must be turned off in order for coupon to print.

MamboSprouts.com: They still have some coupons I have alerted you to before such as $.75 off Organic Valley original or vanilla soy creamer and a few brands of of teas. New are $1 off one Arrowhead Mills breakfast product and $1 off one Country Choice Organic product.

Kashi: Swagbucks and coupons.com have three different Kashi coupons available to print: $1 off any TLC crackers, $1 off any 3 GOLEAN bars (singles or multipacks) and $1.50 off any two boxes of TLC bars. If you do Swagbucks, remember to print your limit from there first so you get your Swagbucks after redeeming the coupon.


Saturday, August 27, 2011

Cooked Salsa


I am more of a fresh salsa girl because I love the crunch of fresh veggies, but my husband likes both fresh and cooked. I got a great deal on some roma tomatoes at the farmers market this morning, and since there were some in there that were really, really ripe and not great for a fresh salsa, I am also doing a cooked one today. I also got some long green chilies, strong onion and a jalapeno at the market since I only had one from my garden to use and used it on the fresh salsa I made earlier.

Note: this is NOT formulated for canning safely!

As with the fresh salsa, you can use any variety of tomato you like. I prefer roma, as they are firmer and create a less watery salsa, decreasing the cooking time a bit. Since the tomatoes will cook down, you'll need to start with more tomatoes than you think you'll need, so don't worry if it looks like a lot. You will want to peel your tomatoes for a cooked salsa, and you will find instructions for that at the end of this post. Whether or not you seed your tomatoes is totally up to you. I usually don't seed mine beyond what falls out on its own, but some prefer their salsa without the random tomato seeds.

The tomato paste really is an important part of the recipe, in case you were wondering if you could get by without. When you cook the salsa, you draw out a lot of water and deplete a lot of that fresh, ripe flavor--the tomato paste tightens the salsa up a bit and adds necessary flavor.


Cooked Salsa

3 cups tomatoes, peeled, cored and chopped (I used about 12 roma tomatoes)
1 1/2 cups onion, chopped
2 large long green chilis (mild) or two medium bell peppers
2 cloves garlic, minced
1 Tbsp fresh parsley or cilantro, chopped
1/4 cup tomato paste (about 1/2 6 oz can)
Salt to taste
Optional: chopped jalapeno or other hot chili to taste
Optional: juice of 1/2 a lime, or to taste

Directions: Place tomatoes, onion, chilis/peppers, garlic and salt in a saucepan over medium high heat. Heat to boiling, reduce heat and simmer for 20 minutes. Add tomato paste, parsley/cilantro and lime juice if using, simmer for another 5 minutes and remove from heat. When cooled, serve or chill in fridge.

Cost:

Tomatoes (farmers market): $3/large crate, used about 1/5 = $.60
Long green chilies (farmers market): $.25 each, used 2 = $.50
Onion (farmers market): $.50/each large onion, used 3/4 = $.38
Jalapeno (farmers market): $.25 each = $.25
Tomato paste (organic): $4.99/6 oz can, used 1/2 = $.50
Lime: On sale for $.69, used 1/2 = $.35
Parsley/Garlic = Garden Freebies

Total Cost: $2.58


Peeling Your Tomatoes

Step 1: Bring a pot of water to boiling and fill a large bowl with cold water.

Step 2: Score the bottom of the tomato with an X using a paring knife. Some varieties will peel without being dipped in water if they are ripe/soft enough. If you are pulling of small pieces or pulling too much flesh off with the skin, they will need to be dipped in the boiling water.


Step 3: Place the tomatoes in  the boiling water for 30 seconds to a minute. Remove and place in bowl of cold water. Most of the skins will split, but don't fret if some don't.


Step 4: When cool enough to handle, peel the skins off.


Step 5: I find coring much easier and handling the tomato much easier as well when I cut the peeled tomato in half and then cut a notch/wedge to remove the core.

Step 6: Seed the tomatoes if you wish and chop.

Fresh Salsa


I love fresh salsa, and it's even better when I use fresh-picked ingredients from my own garden or from local growers at the farmers market. I picked tomatoes from my garden this morning, but since my onions are so small still, I picked up some nice strong white ones at the market along with some big ol' long green chilies. The long green chilies are mild, but thy do have a bit more "zip" than a bell pepper, according to the lady I bought them from.

This is really less of a recipe and more of a guide. If there are certain flavors you like, add more, if there's something you don't care for, add less or omit it. We like our salsa really onion-y, so the recipe as written may be a little onion-heavy for some people. My husband reminded me to add a lot of onion before I started in on this recipe, as we are always fighting to fish out the few and very elusive onions in the salsa at our favorite Mexican restaurant! If you aren't a lime fan, leave it out or add just a little. It's not rocket science--you can mix it up however you like!

As far as the "heat" of the salsa, it's written as mild with the optional addition of hot chilies if desired. If the kids are eating the salsa, I stick to one jalapeno. If it's just me and/or my husband, I would probably add two jalapenos, one cayenne or even a bit of a habanero (as I did to some salsa I canned a couple days ago).


Fresh Salsa

2 cups tomato, chopped
1 cup onion, chopped
1 large long green chili (mild) or medium bell pepper, chopped
1 clove garlic, minced
1 Tbsp fresh cilantro or parsley, chopped
Juice of 1/2 a lime
Optional: Chopped jalapeno or any hot chili to taste
Salt to taste

Directions: Place all ingredients in a bowl and gently stir until combined. Serve immediately or chill before serving.


Cost:

Tomatoes/Garlic/Parsley/Jalapeno: Garden Freebies
Onion (farmers market): $.50 each for large onions, used 1/2 =$.25
Green chili: $.25 each large chili = $.25
Lime: On sale $.69 each, used 1/2 = $.35

Total Cost: $.85

Wednesday, August 24, 2011

"You Can Do It Better Yourself" Chicken and Broccoli Alfredo


This is the first recipe in my "You Can Do It Better Yourself" series (check out the linked post for information on the series as well as a couple tips to make them even quicker). Not only is this made with real, simple ingredients and fresh vegetables (as opposed to the three dehydrated  flecks of vegetables you find in the prepackaged meals), but it is a great substitute for a traditional alfredo pasta, which although delicious, is a little too heavy on the cream, cheese and butter for me! Omit the chicken, and you have an easy and economical vegetarian dish as well.

Served with a kale and tomato salad from the garden and five of my 100% whole wheat buns (at $.16 each), we had quite a filling meal that's not too terribly bad on the "healthfulness scale" for only $5.89, and it took me no longer than 20 minutes to prepare!


Chicken and Broccoli Alfredo

6 oz dry pasta or 3 cups cooked
1/2 Tbsp olive oil
1/2 lb boneless skinless chicken, diced
2 cups broccoli florets (be generous if you like broccoli)
2 cloves garlic, minced
3/4 cup homemade vegetable stock (or any vegetable or chicken stock)
4 oz neufchatel cheese/light cream cheese, cut into cubes
1/4 cup parmesan cheese, shredded
Reserved pasta water
Salt and pepper to taste

Directions: If pasta is uncooked, begin preparing according to package directions, stopping cooking a few minutes before the recommended time so it doesn't overcook later. Meanwhile, heat olive oil in large skillet over medium to medium high heat. Add garlic, chicken, salt and pepper and cook just until chicken is no longer pink on the outside, 5-7 minutes.

Add stock, broccoli and cooked pasta, bring to a boil, reduce heat and simmer until broccoli is tender, about 10 minutes. Slowly stir in neufchatel/cream cheese and parmesan until melted smooth and all other ingredients are evenly coated. If you need a little more liquid to help cheese melt smooth, add pasta water a tablespoon or two at a time. It will thicken after it's removed from heat, but if there is too much liquid, let simmer for a few more minutes, until it reaches desired thickness. Add additional salt and pepper if desired.

Note: If you are using precooked chicken, add it to the pan with the broccoli, stock, pasta and garlic and follow directions from that point.

Cost:

Chicken (veg-fed/no antibiotics): On sale $4/lb, 1/2 lb = $2.00
Broccoli (organic): $1.88/bunch after sale (Hy-vee) and coupon (Recyclebank), used 1/2 bunch = $.94
Pasta (whole wheat): $1.22/13.25 oz box, used just under half = $.55
Cream cheese (organic): $1.99 per 8 oz pkg, used 1/2 =$1.00
Parmesan cheese: $2.99/5 oz, used 1/5 = $.60
Vegetable stock: Homemade Freebie

Total Cost: $5.09
Four Servings: $1.27 per serving
Six Servings: $.85 per serving

Monday, August 22, 2011

You Can Do It Better Yourself!

I am working on a series of "You Can Do It Better Yourself..." recipes in response to those boxed meals that......offer assistance in preparing dinner--you know, the ones with the little packets of "cheese", and seasonings in powder form and tiny pouches of pasta or rice to which you add browned meat. I'm not going to preach to you regarding what I believe are the evils of such meals, which believe me, are many in my opinion, I will however try to sell you on making similar dishes with simple, fresh ingredients (that you can pronounce) that are just as quick and easy. They may not be the most healthful recipes in my repertoire, but I do my best to make them as healthful as possible, and they are nice to enjoy every once in awhile when I need something for supper I don't have to think too much about. It also keeps my family happily eating my healthful meals when they feel like they get a taste of familiar dishes. Served with fresh veggies and fruit, they really are meals I still feel good about eating and serving to my family!

One thing that baffles me about those boxed meals is the large amount of meat they call for in comparison to the small pouches of pasta/rice. I prefer mine with equal parts of meat and pasta, and it's a bonus that cutting down on the meat happens to keep the cost a bit lower as well. Whole wheat pasta and brown rice are good sources of protein on their own, and any of the recipes in this series could easily be made with no meat at all. And if you have gluten/wheat issues, you can of course substitute the gluten free pasta of your choice in the pasta dishes.

I prepare the pasta/rice, brown the meat and prepare the rest of the ingredients for these recipes all at the same time, and that is a huge time saver. When you really need to prepare dinner in record time, here are a couple time saving tips that can make these meals even quicker:

-Cook a large amount of pasta and/or rice to within a few minutes of the recommended cooking time, cool, place in zip-top freezer bags and freeze in stacks. To thaw, either throw a bag in the fridge, remove pasta/rice from bag and defrost in a glass bowl in the microwave for a minute or two or place the bag in a bowl of hot water.

-Brown batches of meats such as ground beef/chicken/turkey or diced chicken breast and follow directions for freezing and thawing pasta above.

Look for tomorrow's recipe, "You Can Do It Better Yourself" Chicken and Broccoli Alfredo!

Sunday, August 21, 2011

Super Chunky Guacamole (Revisited)


Since I can now get everything but the avocado and lime from my garden, I have been making super chunky guacamole up a storm, and I am reposting the recipe from back in May! My favorite meal to eat it for is still breakfast, though I certainly don't have to be convinced to eat it an time of day! ;) ~~~~~~~~~~~~~~~~~~~~~~~~~~~~~~~~~~~~~~~~~~~~~~~~~~~~~~~~~~~~~~~

I love guacamole. LOVE IT! I love it so much that when I was doing Weight Watchers, I ate homemade guacamole and organic tortilla chips for breakfast every day for several months. I also love my food CHUNKY, and guacamole is no exception. This recipe ends up working well for really stretching out the avocado, which can really be expensive at times, with some less expensive veggies. I don't know about where you are at, but the price of avocados (Haas) really fluctuates around here. I passed them over for a couple of weeks when they were a whopping $2.50 each, but I snatched a bunch up a few days ago, when to my utter amazement, they were only $1 a piece! Thanks to that deal, I am splurging and using two avocados in this recipe, but it can be easily adjusted to make with just one avocado or 70, if you are so inclined. If  I use one avocado in the recipe, I get four servings out of it, if I use two avocados, I stretch it to six servings. I can't stretch it past six servings since I am the only one in the house that eats it--and if you are mindlessly dipping tortilla chips in it, you're not going to get more than six servings anyway! ;) You already know I like it with my organic tortilla chips, but I also use it to top salads and chili, spread it on sandwiches and of course put it on tacos and the like. I may or may not be known to eat it by the spoonful on occasion.

I normally use and much prefer red bell peppers but only had a green one left today. They happened to be on sale for $.59 at the grocery store, and since the organic ones were way too insanely priced to even consider, I snatched some up, brought them home and washed them really well. I cannot wait until bell peppers start popping up at our farmers market or in my garden, whichever comes first!

So money talk is out of the way, let's talk nutrition. Avocados are packed with good stuff! Yes, they do have a fair amount of fat, but much of it is the good monounsaturated stuff. They also have pretty close to a little of everything when it comes to vitamins and minerals. A perfect food?! The monounsaturated fatty acids they contain are supposed to be good for busting belly fat...I will let you know how that works out for me.


Super Chunky Guacamole

2 Haas avocados
1 Roma tomato
1/2 small onion, chopped
1/2 bell pepper, chopped
2 cloves garlic, minced
juice from 1/2 lime
1/2 tsp Kosher salt
optional: diced jalapeno or red pepper flakes to taste

Directions: Prepare your avocados using your preferred method (see bellow for my suggestion). I like to leave mine cubed/diced, but you can mash yours if you so desire. Add all other ingredients and stir well.


COST:
Haas avocado: $1 each x 2 = $2
Green bell pepper: $.59 each, used half = $.30
Lime: $.35 each, used 1/2 = $.18
Garlic: One head was $.25, used two cloves, which is 1/6 of the head = $.04
Onion: One small red onion (8 oz) was $.75/lb ($.38 total), used 1/2 = $.19
Roma Tomato: One small one (4 oz) was $1.18/lb = $.30
Total Cost: $3.01
Four servings: $.75 per serving
Six Servings: $.50 per serving 


Handling Your Avocado

I call this the "score and scoop" method. It's easy to do and works really well.

Slice the avocados in half lengthwise, working carefully around the pit. I forgo the traditional knife removal method and remove the pit by softly squeezing the half in which it's embedded--it pops right out.


I then score each half of the avocado in a criss-cross pattern with a paring knife. Work carefully and do not go through the skin. Now it's ready to scoop out with a spoon!

Super Stalker Sunday!

Trying something new today, Super Stalker Sunday!


Saturday, August 20, 2011

Spinach Pasta Salad and Organic Greens Sale/Coupon Alert!


I love pasta salads and green salads as main dishes in the summer--they are light but filling and easy too. I got a great deal on two packages of organic spinach today, so I am frantically coming up with some new ways to use it, especially since I still have another coupon to use for two more before next Wednesday when the sale is up. If you have a Hy-Vee near you, select varieties of their Earthbound Farm Organic salad greens in the 5-7 oz clamshell are on sale two for $5. If you redeem your Recyclebank points for a $2 off two Earthbound Farm Organic products, which is what I did, that makes them only two for $3! Or you can take Earthbound Farm Organic's organic farming quiz and earn a coupon for $1 off, making them two for $4, still a great deal. I didn't want to cook the spinach, as my family enjoys it raw, and I didn't want a plain spinach salad, so I decided to combine a green salad and pasta salad, and here you have it.

I have written the recipe so that it is easy to tailor the flavor to what you and your family like. Use whatever vegetables and herbs you prefer. I used a few organic baby carrots since they were on sale, and then I used what was available in the garden tonight, which was green beans and tomatoes. I forgot I had wanted to add some scallion, that would have been a nice flavor in there. Even just some slivered baby carrots would be great--no need to get fancy, use what you like, what you find in the garden, at the farmers market or on sale at the grocery store. My parsley is about done, so I picked some chives and basil tonight. We ate this as a meatless main dish, though we plan to enjoy it with sliced grilled chicken breast added as well. It's great for either a side or main dish, and you can easily adjust it if you need more or less. This recipe is not heavy on the dressing, as I can't stand soggy spinach, but if you need more, add another tablespoon or two of oil and/or vinegar or even a little vegetable or chicken stock.

This salad with no meat or cheese (I actually intended to add cheese and forgot), combined with a $2 (on sale) pineapple and four of my 100% whole wheat buns with a little honey (the baby and I did not partake) brings the grand total for tonight's supper to $4.62! I will also show the cost for me to add chicken and/or cheese to the recipe just for reference, though depending on what you buy, you could certainly add chicken or any other meat for much cheaper (Hy-Vee has split chicken breasts on sale for $.88/lb this week too).


Spinach Pasta Salad

6 oz dry pasta
2 cups baby spinach, torn if necessary
2 cups chopped fresh vegetables
4 Tbsp olive oil
4 Tbsp red wine vinegar
1 clove garlic, finely minced
1 Tbsp onion, finely minced
2 Tbsp fresh herbs, chopped (about 2 tsp dried)
1/2 tsp salt (or to taste)
1/2 tsp black pepper (or to taste)
Optional: 2 cups diced/shredded chicken, turkey beef or pork
Optional: 2 oz shredded Parmesan or crumbled Feta cheese  (about 1/2 cup)

Directions: Before preparing pasta according to package directions, combine olive oil, vinegar, garlic, onion, herbs and salt and pepper in a small bowl and let sit. When pasta is finished, place it in a large bowl and add dressing, stirring until the pasta is well coated. Add vegetables, spinach, cheese and meat if using and stir. Check  for any additional salt/pepper needed. Serve slightly warm or chill in fridge before serving.

Cost:

Pasta (whole wheat rotini): $1.22/13.6 oz box, used 1/2 = $.61
Baby spinach (organic): $1.50/pkg after sale and coupon, used 1/2 = $.75
Baby carrots (organic): On sale $1.50/1-lb bag, used 1/5 =$.30

Total Cost: $1.66
Six Servings: $.28 per serving


Add meat and/or cheese:

Chicken breast (veg-fed/no antibiotics): On sale $5.49/lb, use 3/4 lb = $4.12
Feta cheese: $3.29/pkg, use BOGO free coupon ($1.65 each), use 1/2 of one pkg = $.83

Friday, August 19, 2011

100% Whole Wheat Rolls/Buns


Confession: I really do not like to bake. I don't know why either, and it actually baffles me since I love to cook so much. So I am spreading my wings and am trying my hand at coming up with my own recipe for whole wheat rolls/buns since I can't find a recipe I like or any store-bought that meet my strict criteria! ;)  You may recall me talking in previous posts about nixing wheat/gluten around here, but my husband is undergoing testing next month for gluten-related issues, so I actually have to make sure he is getting gluten in his diet until then, thus sending me on what is turning out to be a baking frenzy.

All the recipes I have found call themselves "whole wheat", but then I am disappointed to see that they use mostly an all-purpose or bread flour with just a small amount of whole wheat flour. Admittedly, I grew up on 100% whole wheat bread, so I am used to the taste and texture and much prefer it, but if you find you need to ease yourself or your family into it, by all means substitute all purpose flour for some of the whole wheat flour. Give this a chance as is though--my husband raved about how light and moist these are and what a nice texture they have, he said the weren't at all heavy or grainy like he thought they would be! I also didn't want to use milk, butter, shortening or sugar, and while I did use an egg, I am playing around with substitutes (such as milled flaxseed mixed with water, a common egg substitute these days). You could also substitute all or some of the water for milk--water happens to be super easy, and since we limit our milk intake, I don't always have it on hand. Sugar can be substituted for the honey, but if it's not already, you need honey in your life. ;)

You can really get creative here, shaping the dough into dinner rolls, hamburger buns, sub rolls, etc. I yield approximately 16 generously-sized hamburger buns and approximately 24 dinner/cocktail rolls that are also great for sandwiches. You could bake the rolls close together in a baking dish and make pull-apart rolls. I am going to play around with making it into a loaf of bread as well. To make it even more convenient, I freeze the shaped dough I don't need right away and take it out when I need it--you will see instructions below in the recipe. You will also see sort of a "Choose Your Own Adventure" (remember those books?!) section in the instructions. You can either finish the entire recipe in one day, or you can mix up the dough in the evening (I do it after the kids are in bed) and then let it slowly rise in the refrigerator over night and finish them the next day when you get time.

Except for the honey (which is local, from the farmers market) and the yeast, I used all organic ingredients. At only $3.89 for 16 generous burger-sized buns or 24 smaller rolls for sandwiches or just on the side, that is a steal for me. My grocery store's bakery charges $2.69 for 12 cocktail rolls (think what you serve deli meats on at parties), which are not 100% whole wheat and most definitely not made with organic ingredients or the types of ingredients I like to use. They do sell big brand organic breads and buns, but they are always frozen, and they are pushing $6 per package--eeks! Depending on the types of ingredients you use, substitutions and other variables, your cost could be quite low compared to mine even.


100% Whole Wheat Rolls/Buns

5 cups whole wheat flour
1 1/2 cups warm water
1 pkg active dry yeast (2 1/4 tsp)
1/4 cup honey
3 Tbsp canola/vegetable/light olive oil (any light, mild oil)
1 egg, beaten
1 tsp salt

Step 1: In a small bowl, add water and honey, stir and sprinkle in yeast. Let sit for 10 minutes.

Step 2: Add flour and salt to large mixing bowl, make a well in the middle and pour in egg, oil and water mixture. Mix until dough forms a ball. If it is too dry, add warm water just a little bit at a time. If it is sticky/wet, you can correct that in the next step.

Step 3: Turn dough onto lightly floured surface and knead until elastic and smooth, 8 minutes, adding additional flour as necessary to correct wet/sticky dough.

Step 4: Place dough in a large bowl that you've oiled, making sure to coat entire ball of dough with oil as well. Cover bowl and follow one of the following two options, 5A/6A OR 5B/6B:

Step 5A: Place bowl in a warm place and let dough rise until it doubles in size, approximately one hour. Punch dough down and form into rolls of desired size and shape, keeping in mind you will be letting them double in size.

Step 6A: Place rolls on oiled baking sheet 2-3 inches apart, cover and let rise in a warm place for approximately one hour, until doubled in size.

Step 5B: Place bowl in refrigerator overnight. In the morning, punch dough down and form into rolls of desired size, keeping in mind you will be letting them double in size.

Step 6B: Place rolls on oiled baking sheet 2-3 inches apart, cover and let rise in a warm place for approximately 1 1/2 hours, until doubled in size.

Step 7: Bake at 350 degrees for 10-13 minutes, until light golden brown on top. If desired, cover with a towel as they cool to keep them soft.

To freeze dough for ready-to-rise-and-bake rolls: Whichever method you use, letting the dough immediately rise or letting it rise in the fridge overnight, after you divide it into rolls, put them on a baking sheet and into the freezer. When the rolls are frozen, place them in a zip top bag or container. When you want to use them, place them 2-3 inches apart on an oiled baking sheet, cover and let thaw and rise in a warm place until doubled in size, approximately 2 1/2 hours. Bake as directed above.


Cost:

Whole wheat flour (organic): $2.84/2 lb bag, used 5/7 = $2.03
Egg (organic): On sale $3.09/dz, used one = $.26
Canola oil (organic): On sale $5.09/16 oz bottle, used around 1/11 = $.48
Honey (farmers market/local): $4/16 oz bottle, used 1/8 = $.50
Yeast: $1.86/3 pk, used one = $.62

Total Cost: $3.89 
16 Servings: $.24 per serving
24 Servings: $.16 per serving

Thursday, August 18, 2011

Bob's Red Mill Surprise Gift Box Give Away!

Just an example of some of the  Bob's Red Mill products I use!

I have yet to try a Bob's Red Mill product I haven't loved! They are a huge part of ensuring my family eats healthfully, and I have two cupboards full of them, just a few of which include gluten free rolled oats, organic quinoa, flax seeds, brown rice flour, and bread mix (regular and gluten free). One of my favorite breakfasts is Bob's Red Mill Organic High Fiber Oat Bran Hot Cereal (say that five times fast!) with a sliced banana and two tablespoons of sliced almonds stirred in. Warm, comforting, delicious, healthful, and it keeps me full all morning!

I admire Bob's Red Mill and their dedication to producing natural food using natural means as well as their commitment to provide "Whole Grain Foods for Every Meal of the Day.®" There are cereals, whole grains, stone ground flours, baking mixes, beans, seeds and more, including many certified organic and certified gluten free products. So much to choose from!

Give Away Details:

One lucky reader of The Little Red Plate will receive a surprise gift box of four full-size Bob's Red Mill products, chosen by me and specifically tailored to the likes, dislikes, allergies and cooking/baking habits of the winner! This give away has no affiliation with Bob's Red Mill, I simply want to share some of my favorites with you. Give away will be open for entry until 8:59 pm central on Thursday, September 8th, and a winner will be chosen at random at 9:00 pm. Please only one entry per person--if you need a reminder as to whether or not you have entered, feel free to leave a comment here. ;)

**I can't figure out how to edit the form, but if you would rather not leave your email address, please leave your first name and last initial. :)**

Homemade Vegetable Stock (Revisited)

Can you believe this bowl of rich, golden goodness is vegetable stock?!

In honor of garden/veggie season being in full swing, I am re-posting below my very first post from 5/28/11, Homemade Vegetable Stock. I changed it just a little, adding a bit of olive oil and a little cooking time before the water is added. It's a great way to use up those peels, stems, ends, etc. when you're preparing fresh vegetables that otherwise would be thrown away, and if you compost, you can still get the most out of them before tossing them in the pile. I love having the freezer stocked with some at all times--it comes in very handy for many dishes (check out my Roasted Butternut Squash Soup, Very Veggie Soup, Potato and Kale Chowder, Honey Mustard Pasta Salad and Honey Mustard Marinade).
~~~~~~~~~~~~~~~~~~~~~~~~~~~~~~~~~~~~~~~~~~~~~~~~~~~~~~~~~~~~~~~~~

I love making my own vegetable stock! Store-bought stock is expensive, not to mention full of sodium, gluten, etc. Even the organic stocks can have undesirable ingredients, and they are even more expensive. I make stock often and always have some on hand in the freezer. I use it for soups/stews/chili, gravies/sauces, many slow cooking recipes, and even to add a  little more flavor when I'm cooking vegetables, brown rice, quinoa, etc. It's so rich and flavorful (just look at the picture above!) and ridiculously cheap.

Vegetable Stock 

Step 1: Whenever you cut up fresh vegetables, rinse off the parts you would normally toss away, put them in a gallon zip-top bag and keep in your freezer. Examples of what I save are the ends of onions, scallions, bell peppers, eggplant, bok choy, radishes, celery, green beans, parsnips, carrots, zucchini and asparagus, parsley and any other herb stems and mushroom stems. You can even save the peels from apples, pears, sweet potatoes and squash. If there are things I know I won't use up before they go bad and can't/don't want to prep them for freezing and using later, I will chop and add those to the bag as well.

Step 2: When your bag is full, heat 1 Tbsp olive oil in a  4 qt stock/soup pot or Dutch oven, then add the bag of vegetables, three crushed cloves of garlic and a tsp or so of black peppercorns. No salt, as you will season the dishes you make with it. You can always add a couple chunked fresh carrots, celery stalks, scallions or some sprigs of parsley, but I haven't found it necessary, I always get lots of flavor in my stock without it. You could also add other fresh or dried herbs you like, but I like to keep the flavor rather neutral since I never know what I might be using it for. Let cook for about 5-7 minutes, just until the chill is off, stirring often.

Step 3: Add cold water to the pot, up to about an inch from the top. Bring to a boil, reduce heat, cover and simmer on low heat for about 30 minutes, remove from heat and let cool.

Step 4: When cool enough to handle, place a colander over a large bowl or pot that will hold all of the stock and pour the stock into the colander. Let drain for a few minutes so that you get as much of that liquid gold out of there as possible. Compost your mushy veggies! :)

Step 5: Pour stock into freezer containers and freeze what you will not use within the week. You can even pour it into freezer bags and lay them flat while they freeze so they take up little room.


COST: Next to Nothing

Tuesday, August 16, 2011

Olive and Feta Chicken Burgers w/ Coupon Alerts


Much to my surprise, my husband has developed a love of Feta cheese after I first introduced it to him on  a Greek salad a few weeks ago. I also found a jar of Kalamata olives that was on sale and small enough to make trying them for the first time not such an investment, and he loves those too. They are marinated in a Napa Valley Cabernet Sauvignon, olive oil and a blend of herbs, and I have to agree with him, they are really delicious.

I like the ground chicken matched up with these flavors as opposed to beef, which I like to limit our intake of anyway. While I do love that chicken is much easier to find raised, fed and processed more naturally and/or organically than turkey, I also much prefer the flavor of ground chicken over ground turkey. Even when it's very lean, it seems to be easier to keep moist as well. I love the Feta in this burger, because it is not a melting cheese like cheddar/jack/colby, so you won't have a huge mess in your oven or on your grill from burning cheese. And thanks to their fat content, the olives stay nice and lubricated and don't turn into little dry, burned bits. These proportions are perfect for us, it makes two adult-sized burgers and three perfectly kid-sized burgers. You could definitely get 4 adult-sized burgers out of it, and it's easy to adjust if you need more.

If you go to the coupons tab on the Facebook page for Athenos products, you can print a buy one get one (BOGO) free coupon for their Feta cheese. I use the reduced fat, but there are many fun flavor variations in addition to the original. I also used a $1.00 off Smart Chicken I recently alerted you to in a post, which you can find and print at Smart Chicken's Facebook page. The Kalamata olives were my splurge in this recipe, but I find them well worth even the regular price for what ends up being a fairly small cost per recipe. If you would rather, good ol' regular black olives would work well too, and they would be considerably cheaper in regards to your initial investment (though could be more expensive per recipe), especially if you don't have one of those fun olive bars in your grocery store either and jars are your only option.

I served these on 100% whole wheat buns (though they are great without buns too) on sale for $1.69/pkg of eight, of which we  ate five, and with spinach, red onion, cucumber and tomato form the garden for topping. On the side we had some Alexia all natural sweet potato fries, which were $2 a bag after a sale and my $1 off coupon, which you can find on Alexia's website. We will eat about 3/4 of the bag, so combined with the remaining half of the large bag of broccoli I got for $2 at the farmers market, that puts us at $8.38 for a hardy and filling yet healthful meal for five of us, less than a similar meal for one person would cost in a restaurant!


Olive and Feta Chicken Burgers

1 lb ground chicken
1/3 cup Kalamata olives, chopped (about 12 olives)
1/3 cup Feta cheese, crumbled
2 cloves garlic, minced
1 tsp dried oregano
Salt and pepper to taste

Directions: Place chicken in a large mixing bowl, add all other ingredients and gently mix with your hands just until ingredients are well combined. Shape into 4-5 patties and cook to a safe internal temperature (165 degrees for ground chicken/turkey) using desired method. I use a charcoal grill and cook 5 patties for approximately 7 minutes on the first side and 5 minutes on the other side.


Cost:

Ground chicken (Smart Chicken): On sale for $3.99/lb, used $1 off coupon = $2.99
Feta cheese: $3.29/pkg, used BOGO free coupon ($1.65 each), used 1/2 of one pkg = $.83
Kalamata olives: on sale for $4.99/16 oz jar, used apprx 1/5 = $1.00

Total Cost: $4.82
Four Servings: $1.21 per serving
Five Servings: $.97 per serving

Saturday, August 13, 2011

Greek-Style Roasted Eggplant and Tomatoes

I thought this one was too pretty not to crop it into a close-up!


Thanks to a beautifully shaped eggplant I couldn't resist at the farmers market (it was really shiny and purple too!), it's another meatless dinner here today. I had a difficult time trying to think of something to do with the eggplant that didn't include extra oil, bread crumbs and/or flour--I wanted something healthful and simple. Looking at the photo, I wonder if I had pizza on the brain?! I used a baking sheet instead of a baking dish so that the eggplant roasted/caramelized versus getting steamed, making for a much more interesting flavor in my opinion. I left the peel on simply because I forgot about it. I didn't eat it since it didn't get tender enough, so I think next time I might peel it, even though I really like the way it looks with the peel on. This would make a great side dish as well and can easily be adjusted depending on how many you are feeding.

The tomatoes and onion were garden freebies, so there was very little investment in this dish. I served it with half of a huge bag of broccoli I got at the farmers market for only $2.00 and an entire pineapple that was on sale for $2.00, so tonight's dinner was a whopping $4.50!


Greek-Style Roasted Eggplant and Tomatoes

1 medium eggplant, cut into 1/2 " rounds or length-wise slices
2 cups tomatoes, chopped
1/2 cup onion, chopped
2 cloves garlic, minced
1 Tbsp olive oil
1/2 Tbsp red wine vinegar
1 tsp dried oregano
1/3 cup feta cheese, crumbled
Salt and pepper to taste

Step 1: (Optional) Place eggplant slices in a colander over a bowl or sink or on a rack over a baking sheet and sprinkle liberally with kosher salt. Let sit for at least 30 minutes to an hour. This will draw out a brownish, bitter liquid. Rinse thoroughly and pat dry. Some people are sensitive to the bitterness, others don't notice it, some say it depends on the size/age/freshness of the eggplant. I do it because I like that it draws out excess liquid so the eggplant can caramelize better.  

Step 2: Place tomatoes, garlic and onion in a small bowl and add oregano, salt, pepper, oil and vinegar. Gently toss to evenly coat.

Step 3: Lay eggplant slices in a single layer on an oiled baking sheet. Top each slice with tomato mixture and bake at 400 degrees for 30 minutes. Top each slice with crumbled Feta and return to oven for 5 minutes (Feta will not melt).


Cost:

Eggplant (farmers market): $.75
Feta cheese: On sale 2/$5, used $1 off coupon ($1.50/each), used 1/2 pkg = $.75

Total Cost: $1.50
Four Servings: $.38 per serving
Six Servings: $.25 per serving

Friday, August 12, 2011

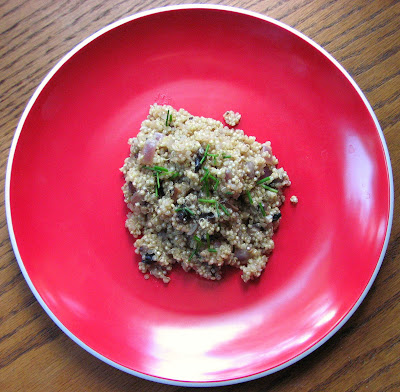
Quinoa and Portobello Pilaf


I usually make a quinoa pilaf as a side dish, but I felt like mixing things up a little and declared today Meatless Friday in our house, so it served as our main dish.  Taking into consideration that portobello mushrooms have an almost meaty flavor and that quinoa contains all of the essential amino acids that qualify it as a complete protein (not to mention its high amounts of dietary fiber, iron, folate and tons of other nutrients), it was a very satisfying main dish, all four kids cleaned their plates, and my husband said he would most definitely eat it again as a main dish.

My local large discount store that I normally try to avoid at all costs put a bunch of the Bob's Red Mill products they aren't going to carry anymore on clearance, plus I had a coupon for $1 off of two Bob's products, so I got a great deal on a couple bags of quinoa.  I usually order quinoa from Amazon.com since it's cheaper to buy a case of four large packages than it is to purchase individual bags or even from the bulk bins at my grocery store (and using my Amazon gift cards for Recyclebank and Swagbucks, I can sometimes get a case for free or very little $). Also check the bulk bins--that's a great way to get just what you need and usually at a lower price. I got my portobello cap from a bulk bin, and it was only one of two options, the other being white button mushrooms. I chose the nice deep flavor of the portobello over the mild and sometimes near-flavorless white buttons, but if you have a wide variety of mushrooms to choose from, you can get creative.

I am serving this alongside kale from the garden dressed with a little olive oil, red wine vinegar and salt and pepper, fresh strawberries that were on sale for $1.50/lb, which we'll probably eat all of, and raw kohlrabi, which was only $.75 for a good sized head at the farmers market, of which we will eat about a third. Another healthful, quick and easy $5 ($4.76) dinner!


Quinoa and Portobello Pilaf

2 Tbsp olive oil
1 cup quinoa, uncooked
2 cups homemade vegetable stock (or any vegetable/chicken stock)
1 large portobello mushroom cap, chopped (apprx 1 1/2 cups)
1 small onion, chopped (apprx 1/2 cup)
1 clove garlic, minced
Salt and pepper to taste
1 Tbsp chopped fresh chives

Directions: Heat olive oil in a large skillet or sauce pan over medium high heat. Add mushrooms, onion and garlic and saute for 3 minutes. Add quinoa and saute for 3-5 minutes, stirring often, just until quinoa is lightly toasted. Add salt, pepper and stock, bring to a boil, reduce heat to medium low, cover and simmer for 18-20 minutes, until stock is absorbed. Stir in chives and/or use them to garnish each serving.


Cost:

Quinoa (organic): On clearance for $7/ bag, coupon for $1 off 2 ($6.50/bag), used 1/4 bag = $1.63
Portobello mushroom: $1.38/cap = $1.38

Total Cost: $3.21
Four Servings: $.80 per serving
Six Servings: $.54 per serving

Thursday, August 11, 2011

Packet-Grilled Beets


I surprised myself and could not resist a gorgeous bunch of beets at the Farmers Market yesterday. I ran into my mom at the market, and she reminded me that I had such disdain for beets as a baby that I would start crying as soon as she or my dad took a jar of them out of the cupboard (and yes, that revelation does make me wonder why they insisted on torturing me so). Beets are a very good source of folate and manganese with a little Vitamin C and dietary fiber thrown in there, so I have given them another chance. They are definitely very........"Earthy" tasting, but they have a natural sweetness mixed in there too.

A few months ago, my husband and I went out with the intentions of purchasing a fancy new gas grill. After reminiscing about the taste of food grilled over charcoal/wood chips, we left with a giant "old-fashioned" Weber grill. We absolutely love it, and my only complaint is that I feel wasteful when I take something off the grill, and there are still perfectly hot coals just sitting there. There are many vegetables and even fruits that I grill along with the usual meats, but I am expanding my horizons in that respect to get the most out of the charcoal (and bonus, no heating up the house for any part of the meal!). There are many vegetables I cook right on the grill grate, but beets really need to tenderize and don't taste quite right to me when partially cooked, so I use the foil packet method.

These were served with grilled salmon topped with Cucumber Salsa and fresh pineapple. The cucumber salsa cost me a total of $.35, the wild-caught Pacific salmon was on sale for $6.29/lb and the pineapple was on sale for $2. So for only $10.64, we had a gorgeous, healthful dinner that took minimal time and effort!


Packet-Grilled Beets

1 lb beets (about 4-6, depending on size)
1 Tbsp olive oil
Salt and pepper to taste
Aluminum foil/premade foil grill packets

Wash beets and peel if desired, or scrub well if leaving peel on (they get very tender and unnoticeable when cooked). Slice into 1/4" thick rounds. Place in a large mixing bowl or zip-top bag, drizzle with olive oil, sprinkle with salt and pepper and toss to coat evenly. Place in foil packet and grill for about 30 minutes, turning halfway.

Admittedly not the supermodel of root vegetables, but there is a definite Earthy sort of beauty there!


Cost:

Beets (farmers market): $2/1 lb bunch = $2.00

Total Cost: $2.00
Four Servings: $.50 per serving
Six Servings: $.33 per serving

Cucumber Salsa


I knew my cucumber plants would climb, but I had know idea the extent to which they would spread out. I wish I would have taken a picture--one of them tried to choke out both a tomato plant and a head of broccoli! It spread out and wrapped a creepy little tendril around each plant before I found it one morning and rerouted it to yet another trellis. So my cucumbers are thriving, and I am left trying to figure out what to do with them after tiring of refrigerator pickles and throwing them on salads. Tiring of refrigerator pickles and homemade ranch dressing, I also needed a new use for my dill. I am also grilling salmon for supper and was thinking about what I would top it with to make it more interesting. So, cucumber salsa it is! I imagine this would be a great topping for almost any fish, maybe even chicken, and I can vouch for the fact that it is equally delicious when scooped up with organic corn tortilla chips.

You can use any blend of fresh herbs, I used the parsley, dill and chives because that's what I have in my backyard. I originally wrote the recipe with just dill and parsley, but I just noticed my chives are dangerously close to out of control, so they got added as well. I wrote the tomato as "1 cup diced" since there are so many varieties and sizes of tomato--I used a couple small roma tomatoes and some little yellow tear-drop shaped grape tomatoes. The only item I purchased for this recipe was a lime, everything else came from my garden. Even if you have to hit up your farmers market or grocery store, it's an economical recipe.


Cucumber Salsa

2 cups cucumber, diced
1 cup tomato, diced
1/2 cup bell pepper, diced
1/2 cup onion, diced
1 small clove garlic, minced
1 tsp fresh dill, chopped
1 tsp fresh parsley, chopped
1 tsp fresh chives, chopped
Juice of half a lemon or lime (about 1 Tbsp, or to taste)
Salt and pepper to taste

Directions: Combine all ingredients in a small bowl and gently stir. Let sit in fridge for at least half an hour before serving.

Very excited to finally have tomatoes ripe for the picking!


Cost:

Lime: On sale for $.69, used 1/2  =$.35
Everything else: Garden Freebies

Total Cost: $.35

Wednesday, August 10, 2011

Rosemary Garlic Potato Wedges


While wandering around the Farmers Market and contemplating a side dish for dinner tonight, some small red potatoes caught my eye. I love roasting them, as they get so creamy on the inside and really don't need much to enhance their flavor. 

I wanted a fresh garlic flavor on the potatoes tonight, but roasting minced garlic at high temps for long periods of time usually results in overly browned or burned garlic bits with a bitter taste. My solution is to warm the olive oil with a smashed clove of garlic or two for just a bit to extract some of that fresh garlic flavor. If you don't care for garlic, by all means, skip that step. If you like a garlic flavor but don't want to take the extra step, sprinkle 1/4 to 1/2 teaspoon of garlic powder on the potatoes before tossing. Rosemary can be incredibly strong, which is why I always use it dried over fresh and don't use a lot, but you can adjust the amount to your own liking. Any variety of small/new potato will work here, and the recipe is very easy to adjust if you need more or fewer servings.

Served with grilled chicken breasts marinated in my Honey Mustard Marinade and some raw broccoli from the farmers market, we have a dinner made with fresh, local ingredients for just under $9!


Rosemary Garlic Potato Wedges

1 1/2 lbs small red potatoes
1 Tbsp olive oil
1-2 cloves garlic, smashed
1/2 tsp dried rosemary, crushed
Salt and pepper to taste

Directions: Warm olive oil and garlic in a small sauce pan over low to medium low heat while you prepare potatoes, for about ten minutes. Scrub potatoes but do not peel, pat dry and cut each potato into 8 wedges. Place in a large bowl or directly onto baking sheet, drizzle with olive oil when it is cool enough to handle, sprinkle with salt, pepper and rosemary and toss to evenly coat. Bake at 425 degrees for 45 minutes, until golden brown, turning once about halfway through.

Cost:

Potatoes: $3.50/quart container, used 3/4 =  $2.63

Total Cost: $2.63
Six Servings: $.44 per serving

Honey Mustard Marinade

Sorry, I forgot to take a pic of the marinade before pouring it over the chicken, so you get this lame photo.


It's a perfect day for grilling, so I think I will post both a marinade and a side dish, yet to be determined, today! I had made up an extra batch of the dressing for my Honey Mustard Chicken Pasta Salad I needed to use up, so I tweaked it a little and came up with this marinade. I am using it on a pound of chicken breasts. We don't eat pork anymore, but plain old Dijon mustard on pork used to be one of my favorite things to grill, so this would be great for a pork loin/roast or pork chops too.

I didn't add any extra acidity (vinegar/lemon juice) since mustard has quite a bit of vinegar in it, and the little added mustard over what I used in the pasta salad dressing gives it plenty of tang. I added just a bit of oil to create an emulsification that will stick to the meat a little better, and I threw in some garlic because, well, I like garlic, and I think it pretty much enhances the flavor of almost anything. If you don't like it, leave it out. As mentioned in my pasta salad post, I used a coarse grain mustard, but a whole grain, brown or Dijon would work well too. I would steer clear of the yellow stuff for this recipe.

At only $1.25 (and that's with organic mustard), this is cheaper than any of the bottled stuff I have seen, and it's much cheaper than buying those pre-marinated meats. And you know exactly what is/isn't in it!


Honey Mustard Marinade

1/2 cup homemade vegetable stock (or any vegetable or chicken stock)
1/3 cup whole/coarse grain, brown or Dijon mustard
2 Tbsp honey
1 Tbsp olive oil
1 clove garlic, minced
1/2 tsp salt
1/2 tsp pepper

Directions: Whisk all ingredients in a small mixing bowl and pour over meat, letting sit in fridge for 1 to 12 hours.

Cost:


Mustard (organic): $3.00 /9 oz jar, used 1/3 = $1.00
Honey (farmers market): $4/16 oz bottle, used 1/16 = $.25
Vegetable Stock: Homemade Freebie

Total Cost: $1.25

Saturday, August 6, 2011

Honey Mustard Chicken Pasta Salad

Forgot the cucumbers before I took the picture!


In trying to come up with more recipes that use the delicious local honey I get from my farmers market, the honey mustard flavor combination, one of my favorites, immediately popped into my head. I don't buy the commercial honey mustard sauces/dressings because of all the additives in it. For the dressing in this recipe, I used only organic mustard, local honey and my homemade vegetable stock (instead of oil). I used a coarse grain mustard, but a whole grain, brown or Dijon would work well too. I am not sure I would try it with a yellow mustard, but if you do, let me know how it turns out!

I have a few freebies in this recipe, but even if you purchase a couple tomatoes, a cucumber and some stock, your cost will not be a lot more than mine. I could have gotten whole wheat pasta instead of the organic gluten free pasta for $1.25 less per package, so it could save you that much over my calculations if organic and/or gluten free pasta is not a concern for you. You don't have to stick to the vegetables I used either. I used what I had in the garden and found at the farmers market (I do have my first bell pepper almost ready in the garden!)--you could substitute/add carrots, broccoli, snap peas, radishes, black olives, banana peppers, etc.

Served with raw organic baby carrots and raw organic broccoli (I used my $2 off 2 Earth Bound Farm products coupon from Recyclebank for them), we had ourselves a fresh, healthful $6 dinner with enough leftover for me for lunch tomorrow!


Honey Mustard Chicken Pasta Salad

6 oz dry pasta, cooked according to package directions
1/2 lb cooked chicken, shredded or chopped (about 2 cups)
1/2 cup homemade vegetable stock (or any vegetable or chicken stock)
1/4 cup whole grain/coarse grain/brown mustard
2 Tbsp honey
2 roma tomatoes, chopped
1 small/med cucumber, chopped
1 bell pepper, chopped
1/2 cup onion, chopped
Salt and pepper to taste
Optional: cheddar cheese, diced into small cubes

Directions: Mix stock, mustard, salt, pepper and honey in a small bowl. Place chicken, vegetables, cheese if using and pasta in a large bowl and pour honey mustard mixture over top, tossing to evenly coat. Refrigerate at least half an hour before serving, stirring a couple times to redistribute dressing.


Cost:

Chicken breast (veg-fed/no antibiotics): On sale $2/8-10 oz breast, used 1 = $2.00
Mustard (organic): $3.00 /9 oz jar, used not quite 1/3 = $1.00
Honey (farmers market): $4/16 oz bottle, used 1/16 = $.25
Pasta (organic/gluten free): On clearance for $2.50/12 oz pkg, used 1/2 = $1.25
Onion (farmers market): $.50, used 1/3 = $.17
Bell pepper (farmers market): $.50, used 1/2 = $.25
Tomatoes: Garden Freebie
Cucumbers: Garden Freebie
Vegetable Stock: Homemade Freebie

Total Cost: $4.92
Six Servings: $.82 per serving

Thursday, August 4, 2011

Sweet and Sour Chicken Sloppy Joes


I do not blame you one bit for thinking you can't possibly imagine how sweet and sour chicken and sloppy joes meld together into one dish. But stay with me here--there are a lot of the same flavors and ingredients in both dishes!

I adore the great big chunks of pineapple, green pepper and onion in sweet and sour chicken, but I diced them small for this recipe so they were around the same size as the pieces of chicken.  I love that this recipe features all of my favorite sweet and sour chicken flavors with much less fat and additives. I will serve it on whole grain buns with homemade roasted potato wedges or sweet potato fries and a salad made with tomatoes and kale from my garden, and we'll have a complete dinner for right around $7!


Sweet and Sour Chicken Sloppy Joes

1 lb ground chicken
1/2 bell pepper, diced (apprx 1/2 cup)
1 small onion, diced (apprx 1/2 cup)
2 small carrots, diced (apprx 3/4 cup)
2 cloves garlic, minced
1/2 cup pineapple, crushed or diced small
1 8 oz can tomato sauce
3 Tbsp honey
1 Tbsp vinegar
1 Tbsp soy sauce
Salt and pepper to taste

Step 1: Place chicken in skillet over medium high heat, season with salt and pepper (go easy on the salt for now since we're adding soy sauce later). When 3/4 of chicken is no longer pink, add carrots, green pepper, garlic and onion. Drain if necessary once all chicken is cooked through.

Step 2: Add pineapple, honey, tomato sauce , soy sauce and vinegar. Bring to a boil, reduce heat and simmer for approximately 10 minutes, until mixture has the consistency you desire.

Alternate Preparation:  After browning meat, place all ingredients in slow cooker and cook on low 6-8 hours or high 3-4 hours.


Cost:

Ground chicken (Smart Chicken): On sale $3.99/lb, used $1 off coupon = $2.99
Bell pepper (farmers market): $.50/each, used 1/2 = $.25
Onion (farmers market): $.50, used 1/3 = $.17
Carrots (farmers market): $2.00/bunch, used 1/6 = $.33
Pineapple: $1.38/each after sale and coupon, used apprx 1/6 =$.23
Honey (farmers market): $4/16 oz jar, used 1.5 oz = $.38
Tomato sauce (organic): 8 oz can on sale = $.75

Total Cost: $5.10
Six Servings: $.85 per serving

Wednesday, August 3, 2011

Farmers Market Ratatouille


Nope, it's not just a movie! But I do have to say, thanks to the movie, my kids were much more excited to try my ratatouille than I know they would have been otherwise. Ratatouille makes a great main dish, served with quinoa, couscous or brown rice, and it makes a great side dish served with grilled chicken or fish. The recipe can very easily be adjusted to fit your needs as far as number of servings.

Continuing with the theme of late, there are many, many different recipes for ratatouille. You will find varied ingredients and varied preparations. I adjusted this one to the vegetables I found at the farmers market this morning (pretty much the usual at my market) and the herbs growing in my backyard. Use what's in season and at a good price. As for preparation, I skip the the strictly stove-top preparation you will often see in recipes (makes it too mushy for my taste) and even the sauteing of the vegetables prior to baking, and I just layer everything right in a baking dish--keeps it a bit fresher tasting in my opinion. Using the slow cooker is also a great option when you need the convenience.

This is a fresh, healthful dish, and combined with some quinoa or brown rice and fresh fruit, we'll have another $5 supper tonight!


Farmers Market Ratatouille

1 small eggplant, peeled and sliced into rounds (roughly 2 cups)
1 medium zucchini, sliced into rounds (roughly 2 cups)
2 medium tomatoes, sliced into rounds (roughly 1 1/2 cups)
1 medium yellow squash, sliced into rounds (roughly 2 cups)
1 small onion, sliced into rings (roughly 1 cup)
1 medium bell pepper, sliced into rings (roughly 1 cup)
3 cloves garlic, minced
1 Tbsp fresh basil, chopped
1 Tbsp fresh parsley, chopped
1 Tbsp olive oil
Salt and pepper to taste
Optional: Parmesan cheese


Step 1: Optional: After eggplant is peeled and sliced, place in a colander. Generously sprinkle with kosher salt and let sit for at least 30 minutes to an hour. This will draw out a brownish, sometimes bitter liquid. Rinse thoroughly and pat dry. If your eggplant is small and does not have many seeds, or if it is fresh, you might be able to skip this step. If it's larger and has many seeds, you might want to let it sit longer. Some people don't notice a bitter taste in eggplant, others are very sensitive to it. Possible bitterness aside, it does draw out excess moisture and can help keep the eggplant from becoming super mushy. 

Step 2: Layer the vegetables in a 9" x 11" or similar-sized baking dish, dividing the olive oil, salt, pepper and herbs and sprinkling over two or three layers of vegetables.

Step 3: Bake at 375 degrees for 45 minutes. Top individual servings with Parmesan cheese if desired, or add to top of entire dish during last ten minutes of cooking. 

Alternate Preparation: Layer ingredients in slow cooker and cook on low for 6-8 hours.


Cost:

Eggplant: $.75
Zucchini: $.75, used 1/2 = $.38
Tomatoes: $2/6 Roma tomatoes, used 2 = $.67
Yellow squash: $.50
Onion: $.50, used 1/3 = $.17
Bell pepper: $.50

Total Cost: $2.97
Six Servings: $.50 per serving